Buying the sensors is the easy part. This page is the part that actually matters: the tools you need, how to flash a sensor on your Mac or PC, get it on WiFi, have it talk to your Cognitum One Seed, and then bring in RuView to make sense of the data. Honest, step-by-step, no hand-waving.
Every WiFi sensor follows the same five-step path. Get this mental model first and nothing below is confusing.
The LD6004 radar skips steps 2–3 entirely — nothing to flash, it just wires to the GPIO header. The WiFi sensors need all five.
The easy way: let Claude Code do the fiddly parts
This guide assumes you're working in VS Code with Claude Code. The simplest path: open your project, add RuView as a git submodule (next section), install the RuView plugin, and then mostly just tell Claude Code in plain English what you want — it flashes the nodes, sets their WiFi, and helps wire up the dashboard for you. (Having Ruflo installed adds extra orchestration, but it's not required.)
The exact commands below are "under the hood" — handy if you want to understand them or do it by hand, but you usually won't need to type them yourself.
01 — WHAT YOU NEED ON THE BENCH
Cables & tools — get these first
Missing one of these is the #1 reason a beginner stalls for an evening.
Tool
What it's for
Don't get this wrong
USB-C data cable
Connecting an ESP32 to your Mac/PC to flash it
Many cables are charge-only — they power the board but carry no data, so flashing silently fails. Buy one labelled "data".
A Mac or PC
Running the flashing tool
You flash once per node, then it runs on its own.
Your Cognitum One Seed (the host)
Receives the sensor streams — this is the brain
Give it the power supply specified for your model. Underpowering causes random dropouts that look like sensor failures.
Your WiFi name + password
The sensor needs to join your network
All the sensing nodes (S3, C6, MR60) are 2.4 GHz only. Bonus: enable WiFi 6 (802.11ax) on your router's 2.4 GHz band — that's what unlocks the C6's 242-tone high-fidelity CSI.
The Seed's IP address
So the sensor knows where to send data
If the Seed's IP changes (DHCP), sensors "disappear" — reserve the Seed's address in your router.
02 — FLASHING
Getting firmware onto each sensor
"Flashing" just means copying the sensor's program onto its chip over USB. Each sensor is different — and the radars need no flashing at all.
LD6004 radar — wire it to GPIO, and never brown-out ✓
No flashing either — the LD6004 talks plain serial. But how you power it decides whether it stays alive. Field lesson from our own rig: LD2450s on a USB hub froze repeatedly (USB-serial adapters die under hub power variance; only re-seating directly into the Pi fixed them). The LD6004 avoids that class of failure entirely by skipping USB: four jumper wires straight to the Pi's GPIO header, powered by the Pi's own 3.3 V rail. Result on our rig: zero brown-outs in 7+ weeks of continuous duty (the module draws an estimated <50 mA against the rail's ~300 mA budget).
LD6004 pin
Wire color (typical)
Raspberry Pi header pin
What it is
VCC
Red
Pin 1
3.3 V power
GND
Black
Pin 6
Ground
TX (sensor out)
Yellow
Pin 8 (GPIO 14)
Pi receives data here
RX (sensor in)
Green
Pin 10 (GPIO 15)
Pi transmits here
It appears as /dev/serial0 at 115200 baud (8N1, fixed — there's no command to change it). The "rich" firmware variant streams X/Y/Z floats in meters at ~10 Hz; when the room is empty you still get heartbeat packets, which is your "sensor alive" signal. Wire colors are convention, not guarantee — trust the pin labels on the module, not the wire colors.
Rules of thumb for any radar: GPIO UART beats USB; if a sensor must be USB (LD2450), plug it directly into the Pi or use a powered hub; and your AX210/BE200 card never competes for this power — it lives on the Pi 5's PCIe HAT, a separate rail. (Honest gaps: the LD6004's exact current draw and in-field Z-axis noise floor aren't formally specified — our numbers are observed-in-deployment, not datasheet.)
Hate the flimsy little wires? You're right to. Friction-fit Dupont jumpers work, but they wiggle loose and feel like they'll snap — we've broken them. Three sturdier upgrades, easiest first: (1) a screw-terminal GPIO breakout HAT (~$12–18, search "Raspberry Pi GPIO screw terminal HAT") — every wire clamps under a screw, nothing can wiggle out, labels printed next to each terminal; the single best upgrade for less-technical builders. (2) JST-XH pre-crimped locking harnesses (~$8 a kit) — connectors that click and can't pull free; needs matching headers on the radar side. (3) Strain relief regardless: a dab of hot glue over the seated connector plus a zip-tie anchoring the cable an inch away turns even Dupont wires into something that survives handling. (We've field-tested the bare-Dupont path; the screw-terminal HAT recommendation is standard practice, not yet our own rig.)
Powering the sensors that hang off the Pi: everything attached to the Pi — the GPIO radar, a USB LD2450, anything on the header — draws from the Pi's own power supply, so the PSU is the foundation: use the official 27 W USB-C supply for a Pi 5 (with a weaker one, the Pi caps its USB ports at 600 mA total and peripherals brown out; with the 27 W it allows 1.6 A). Sensors not attached to the Pi power themselves: ESP32 nodes from wall adapters or always-on batteries (see the battery section), the MR60 from any USB-C source.
Already own an LD2450? It still works — but it's not the pick
The LD2450 USB kit needs no flashing either: plug its USB adapter into the Seed and read serial at 256000 baud (the unusual rate — not 115200). For movement it's been superseded by the LD6004 (true 3D, GPIO power, no USB-hub flakiness). Reach for an LD2450 only if you can't touch GPIO pins at all, or you specifically need 3 people tracked at once (2D). If you're buying new, buy the LD6004.
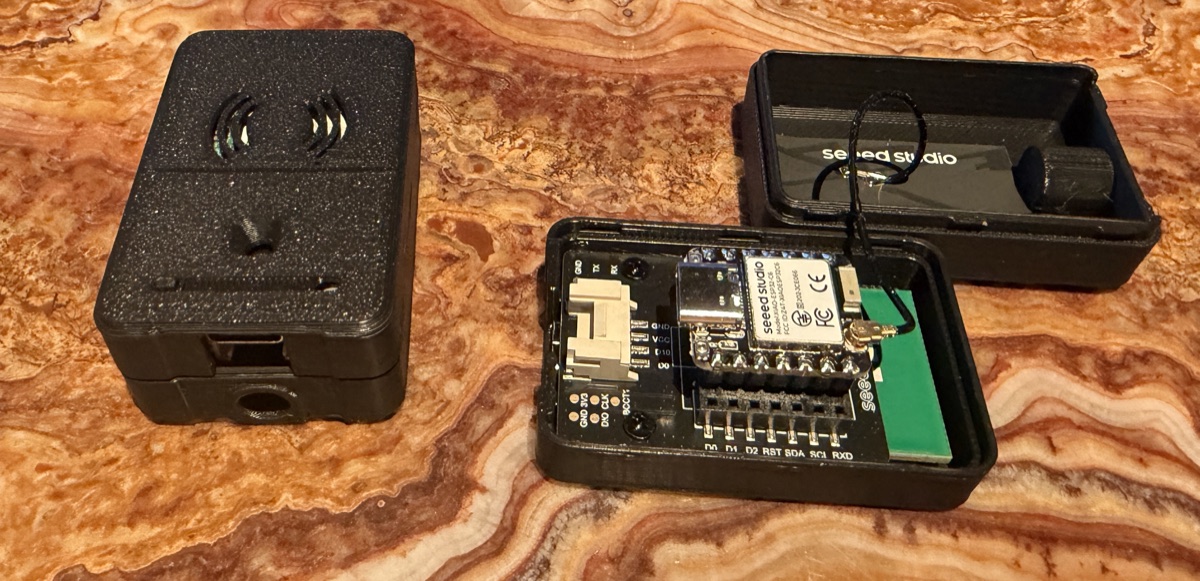
MR60BHA2 vitals — ships ready, configure over WiFi
It comes pre-loaded with ESPHome firmware, so you don't flash it — it just needs your WiFi credentials. The simplest way: ask Claude Code to provision its WiFi (ESPHome is what's running under the hood). Then the Seed connects out to it and pulls heart rate & breathing over TCP 6053.
The trap: the XIAO has two USB-C ports. The one on the case edge is power only. To configure it, open the case and use the XIAO's own inner USB-C port. ESPHome docs ↗
Good to know: the case pops apart easily. The middle carrier holds the XIAO with its inner USB-C (the data/flash port) plus the 60 GHz radar module — that inner port is the one you plug into, not the power-only port on the case edge.
ESP32 CSI nodes — these get flashed (once)
Easiest: with the RuView plugin loaded in Claude Code, just plug a node into your Mac/PC and ask. Type something like:
"Flash this ESP32-S3 as CSI node #1, join WiFi 'MyNetwork' / 'mypassword',
and stream to my Seed at 10.0.0.50 on UDP 5005."
Claude Code (driving RuView) handles the toolchain, the config and the flash. Repeat for each node, bumping the number to 2, 3 … 7. Prefer to do it by hand? Here's exactly what's happening under the hood (Espressif's free ESP-IDF / esptool):
1
Install the toolchain (once)
Install a current ESP-IDF by following Espressif's official get-started guide (the v0.8.0-esp32 release notes call for v5.5.2 for the C6's full HE-LTF CSI; RuView's in-repo firmware README still documents v5.4 — check the release notes). It brings the build tool idf.py and the flasher esptool. ESP-IDF Get Started ↗
2
Plug the board into your computer
Use a real USB-C data cable. It appears as a serial port (e.g. /dev/cu.usbmodem… on a Mac).
3
Set four things, then build & flash
Open menuconfig and set: a node ID (1, 2, 3… one per board), your WiFi SSID + password, the Seed's IP, and the UDP port (5005). Then:
# RuView's CSI firmware builds for the C6 and S3 (there is NO C5 target)
cd RuView/firmware/esp32-csi-node
idf.py set-target esp32c6        # or: esp32s3 — release notes say IDF 5.5.2+ for full C6 HE-LTF CSI
idf.py build
idf.py -p /dev/cu.usbmodemXXXX flash monitor
# then provision WiFi + node ID + Seed IP (no reflash needed):
python provision.py --port /dev/cu.usbmodemXXXX \
  --ssid "YourWiFi" --password "secret" --target-ip 192.168.1.20 --node-id 1
4
Confirm it's sending
On the Seed, watch for its packets:
tcpdump -ni any udp port 5005 # expect ~10 packets/sec from the node
Flash each node with a different node ID. Repeat for 3+ nodes — a single CSI node can't locate anything.
M5StickS3 (motion) — same idea, it's an ESP32-S3
If you added the M5StickS3, it's an ESP32-S3 board, so you flash it the same way (ESP-IDF / esptool) — or use M5's own no-code tool, UIFlow. Set your WiFi + the Seed's address, and it streams its IMU (motion/vibration) to the Seed over WiFi. It's the in-stock successor to the discontinued M5StickC PLUS2.
03 — WIFI → SEED
How the data actually reaches the Seed
A point that confuses everyone: there are different ports for different jobs. Don't mix them up.
Sensor
How it reaches the Seed
Port
ESP32 CSI nodes
Stream UDP over WiFi to the Seed
UDP 5005
MR60BHA2 vitals
The Seed connects out and pulls from it
TCP 6053
LD6004 radar
Four jumper wires to the GPIO header (serial)
/dev/serial0 · 115200 baud
LD2450 radar (legacy)
USB cable straight into the Seed (serial)
USB · 256000 baud
Don't confuse the ports. Sensors send their data to the Seed — CSI on UDP 5005, vitals on TCP 6053. What the Seed sends back out to a dashboard is a separate connection — don't mix up the inbound sensor ports with the outbound one. Bands matter too: every sensing node here (S3, C6, MR60) lives on 2.4 GHz — and WiFi 6 on that band is what feeds the C6 its full 242-tone fidelity.
04 — RUVIEW
Bring in RuView to read the WiFi
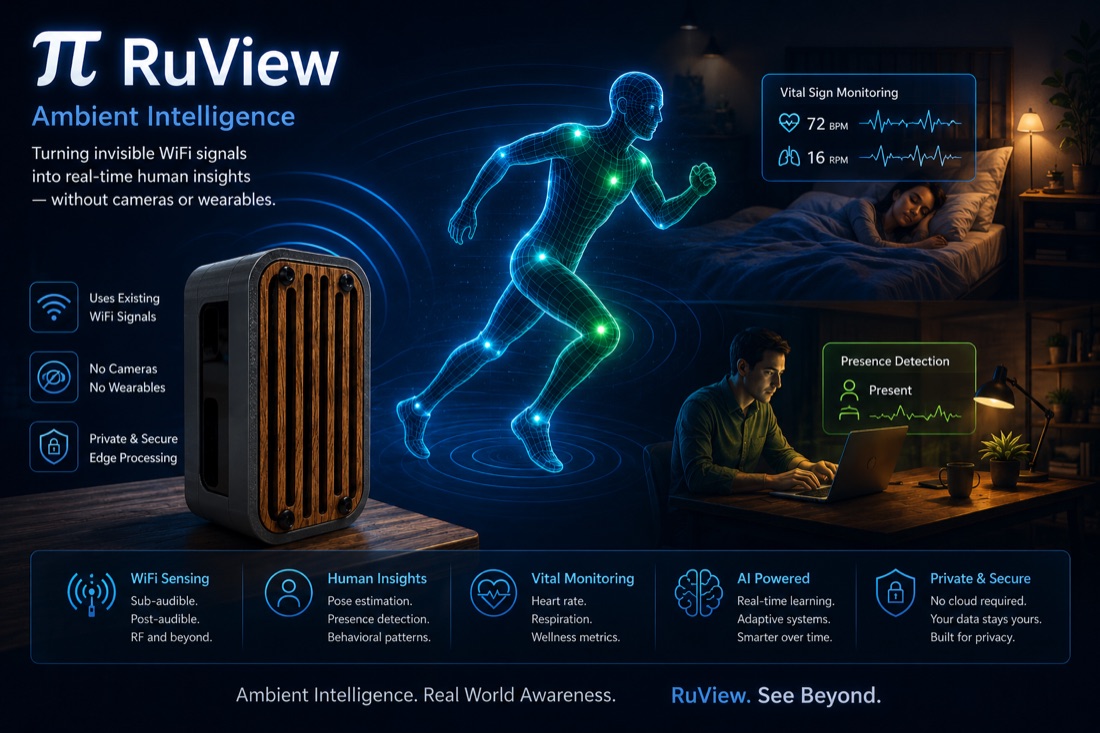
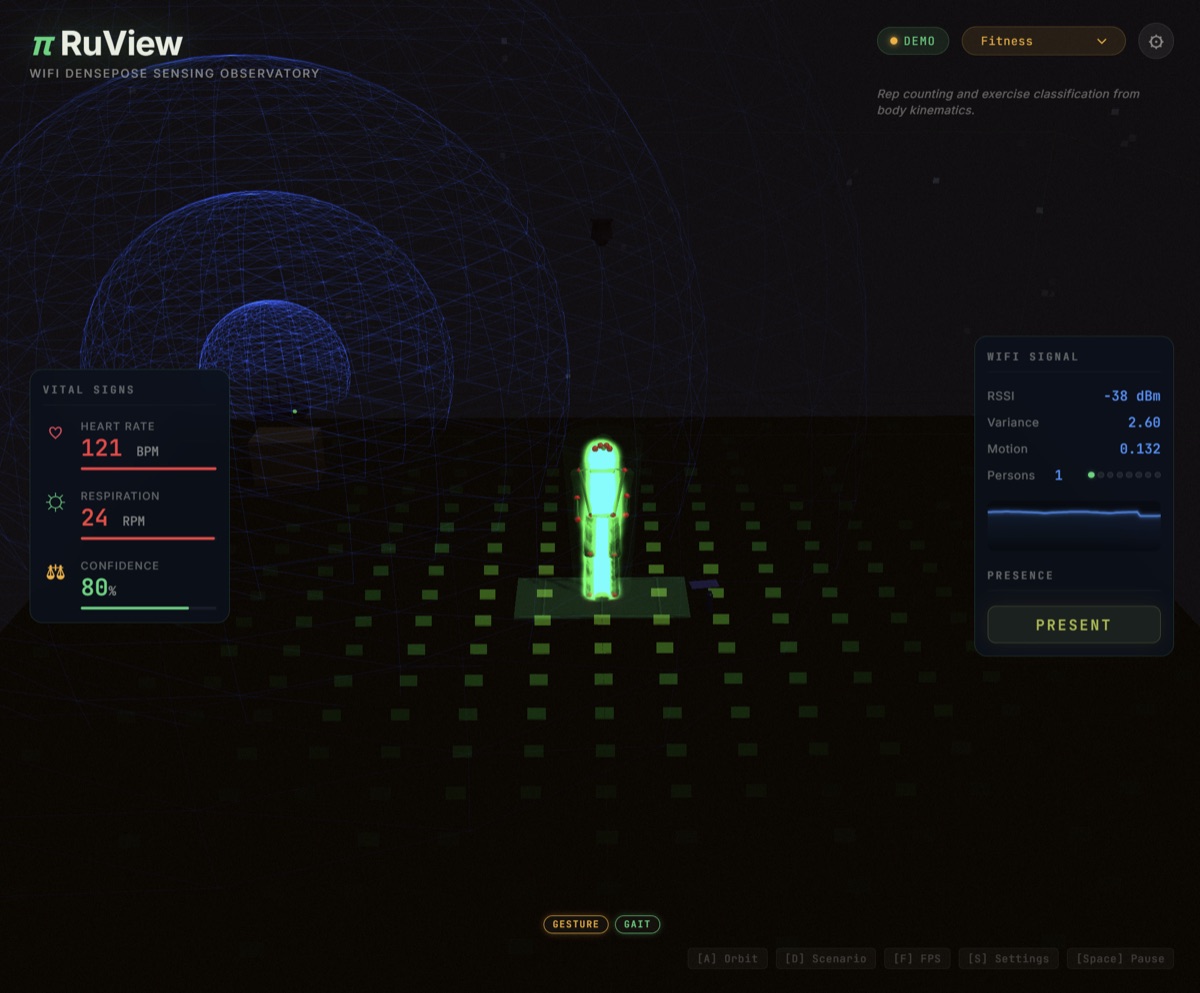
RuView (Ruv's open-source project) is the software that turns raw WiFi-CSI into presence, breathing, and the anonymous identity "fingerprint." Here's how to pull it in and build it. github.com/ruvnet/RuView ↗
What RuView is (left) and what it shows once running (right): WiFi-only sensing — presence, breathing, heart rate and a live body figure, no camera, no wearable. (Images from the RuView project.)
So what is it? RuView is Ruv's open-source "ambient intelligence" software. It takes the raw WiFi-CSI your ESP32 nodes stream in and turns it into a live read of the room — presence, breathing, heart rate, a rough body pose, and an anonymous identity "fingerprint" — all on-device, no cloud. It's the brain-software that makes your sensor array actually mean something.
1
Bring in RuView & build it
Clone it (simplest), or — if you're building your own project around it — add it as a git submodule so it's pinned inside your repo. Then build the Rust core:
# simplest — just clone it:
git clone https://github.com/ruvnet/RuView

# …or pin it inside your own project as a submodule:
git submodule add https://github.com/ruvnet/RuView vendor/RuView
git submodule update --init --recursive

# then build it:
cd RuView/v2 && cargo build --release
For the Python path, follow the repo's README rather than guessing a package name.
2
Just want to peek first? (no hardware — optional)
Optional: spin up the demo in Docker to see the interface on simulated data before you wire anything up.
docker pull ruvnet/wifi-densepose:latest
docker run -p 3000:3000 ruvnet/wifi-densepose:latest   # open http://localhost:3000
3
Use the RuView plugin (in Claude Code)
"The RuView plugin" is a Claude Code plugin — it gives an AI agent the skills and commands to drive RuView. Install it:
(There's also a separate MCP server, @ruvnet/rvagent, and on-device "cogs" — those are different things; the plugin is the Claude Code one above.)
4
Point it at your CSI nodes
RuView's aggregator listens for the same CSI stream your nodes send (UDP 5005). It turns the WiFi into presence, breathing/heart rate, and a 128-number fingerprint of who/what is in the room.
Be honest with yourself about what ships today
No pretrained weights. The --model flag is optional — the server runs fine without it, but the encoder produces random vectors until you train it (contrastive learning). There's no ready-made model to load yet.
Identity is anonymous. The fingerprint re-identifies the same body across sessions; it does not put a name to anyone.
Pose is rough. Camera-free pose accuracy is low today; presence & breathing are the solid wins.
Start here: README.md, then docs/user-guide.md and install.sh in the repo. Live demo: ruvnet.github.io/RuView ↗
05 — WHEN IT WON'T WORK
The checklist that fixes 90% of stalls
Flashing fails silently. Your USB-C cable is charge-only — swap for a data cable. (MR60: you're on the case-edge power-only port; use the inner one.)
Board won't join WiFi. Wrong band: an S3/C6 physically can't see 5 GHz networks. Point it at your 2.4 GHz SSID.
Flashed, but no data on the Seed. Open UDP 5005 on the Seed's firewall; check you set the correct Seed IP in menuconfig.
LD2450 reads zeros. Baud must be 256000, not the usual 115200.
A sensor "disappeared". Its DHCP IP changed — reserve sensor + Seed MACs in your router.
MR60 shows null. It's still warming up — wait ~60 seconds after power-on.