A plain-language primer for anyone who just received a Cognitum One Seed and has no idea what all these chips, radars and antennas actually do. We cover the sensors you can buy today and hook up — three that sense a room contactlessly, plus one you attach for motion.
Before sensors, understand the thing you just unboxed. The Seed is not a sensor itself — it's a brain.
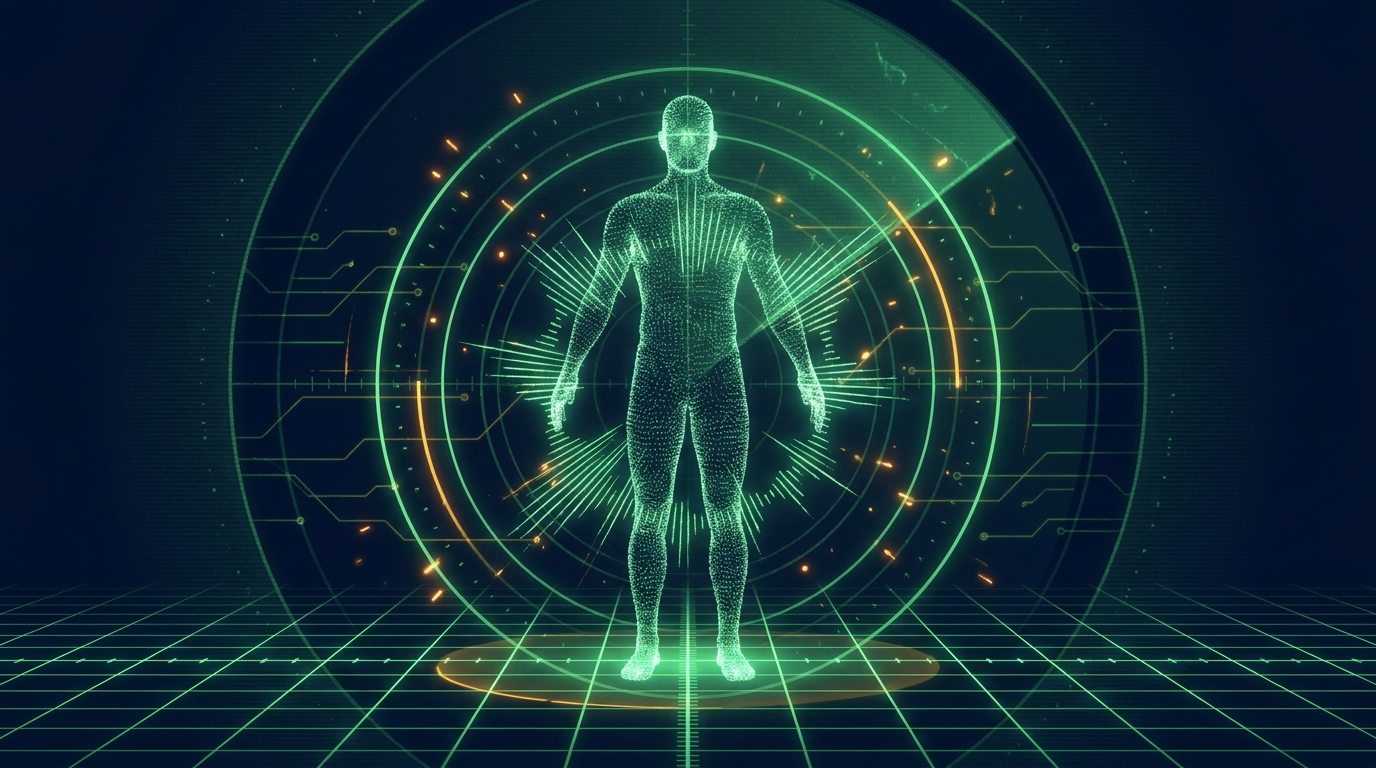
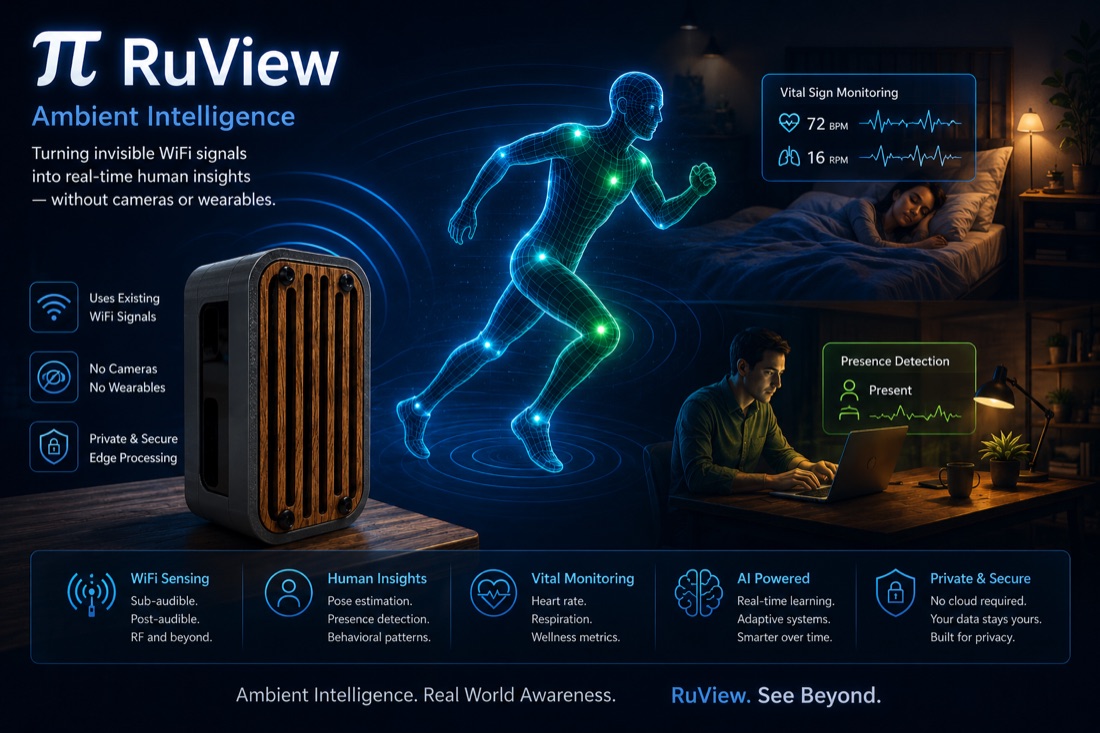
The Cognitum One Seed is a tiny, self-contained AI computer — it runs on-device intelligence with no cloud required. It senses the space around it, remembers what it learns as mathematical "fingerprints," and can recognise patterns passively — just by watching, never by asking you to scan or wear anything.
Out of the box it has a few simple built-in senses. But the moment you want to sense finer things — exactly where a body is, a heartbeat through the air, the shape of a person with no camera — you connect the sensors in this guide. Some wire straight into the Seed's pins; the richer ones connect to the same Seed over USB or WiFi (that's the next section).
Runs everything locally. Turns raw sensor numbers into memory.
Each one perceives a different slice of physical reality — all contactless.
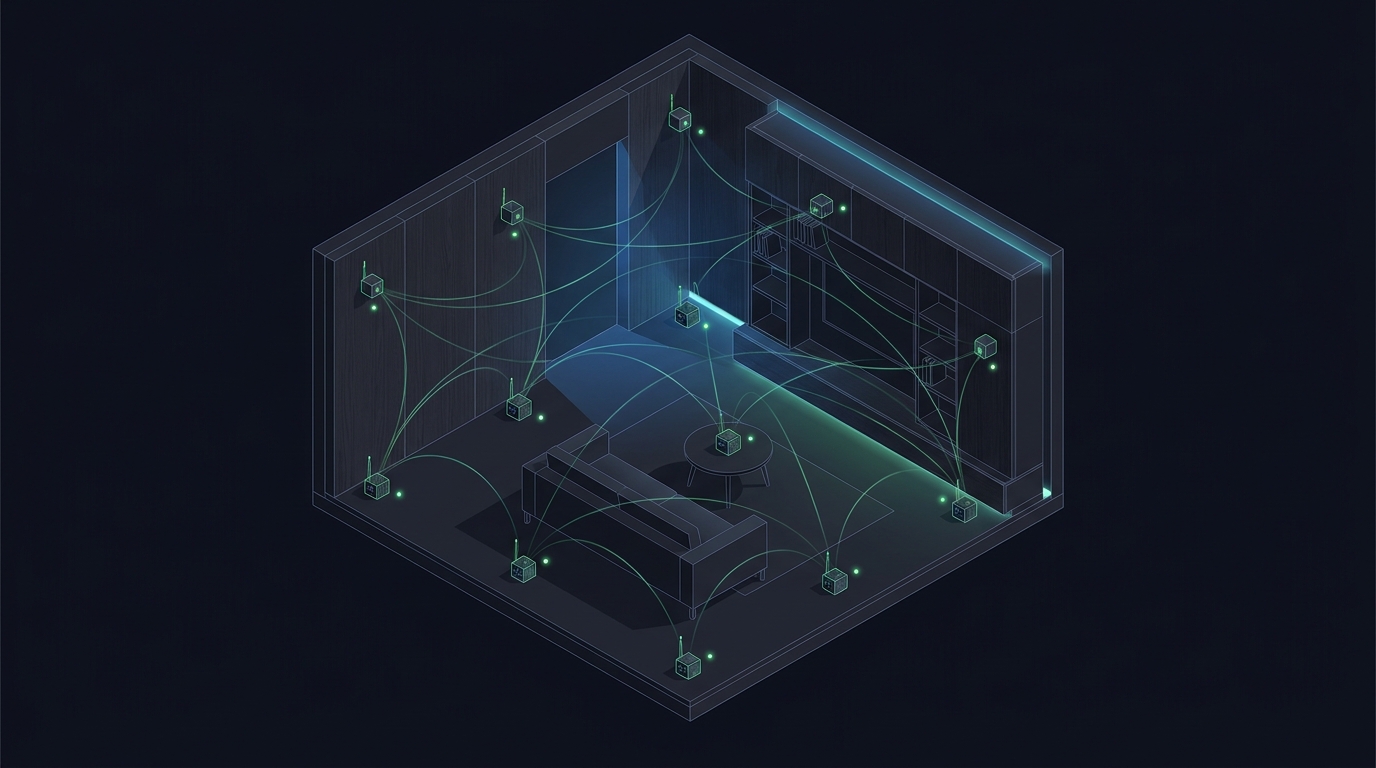
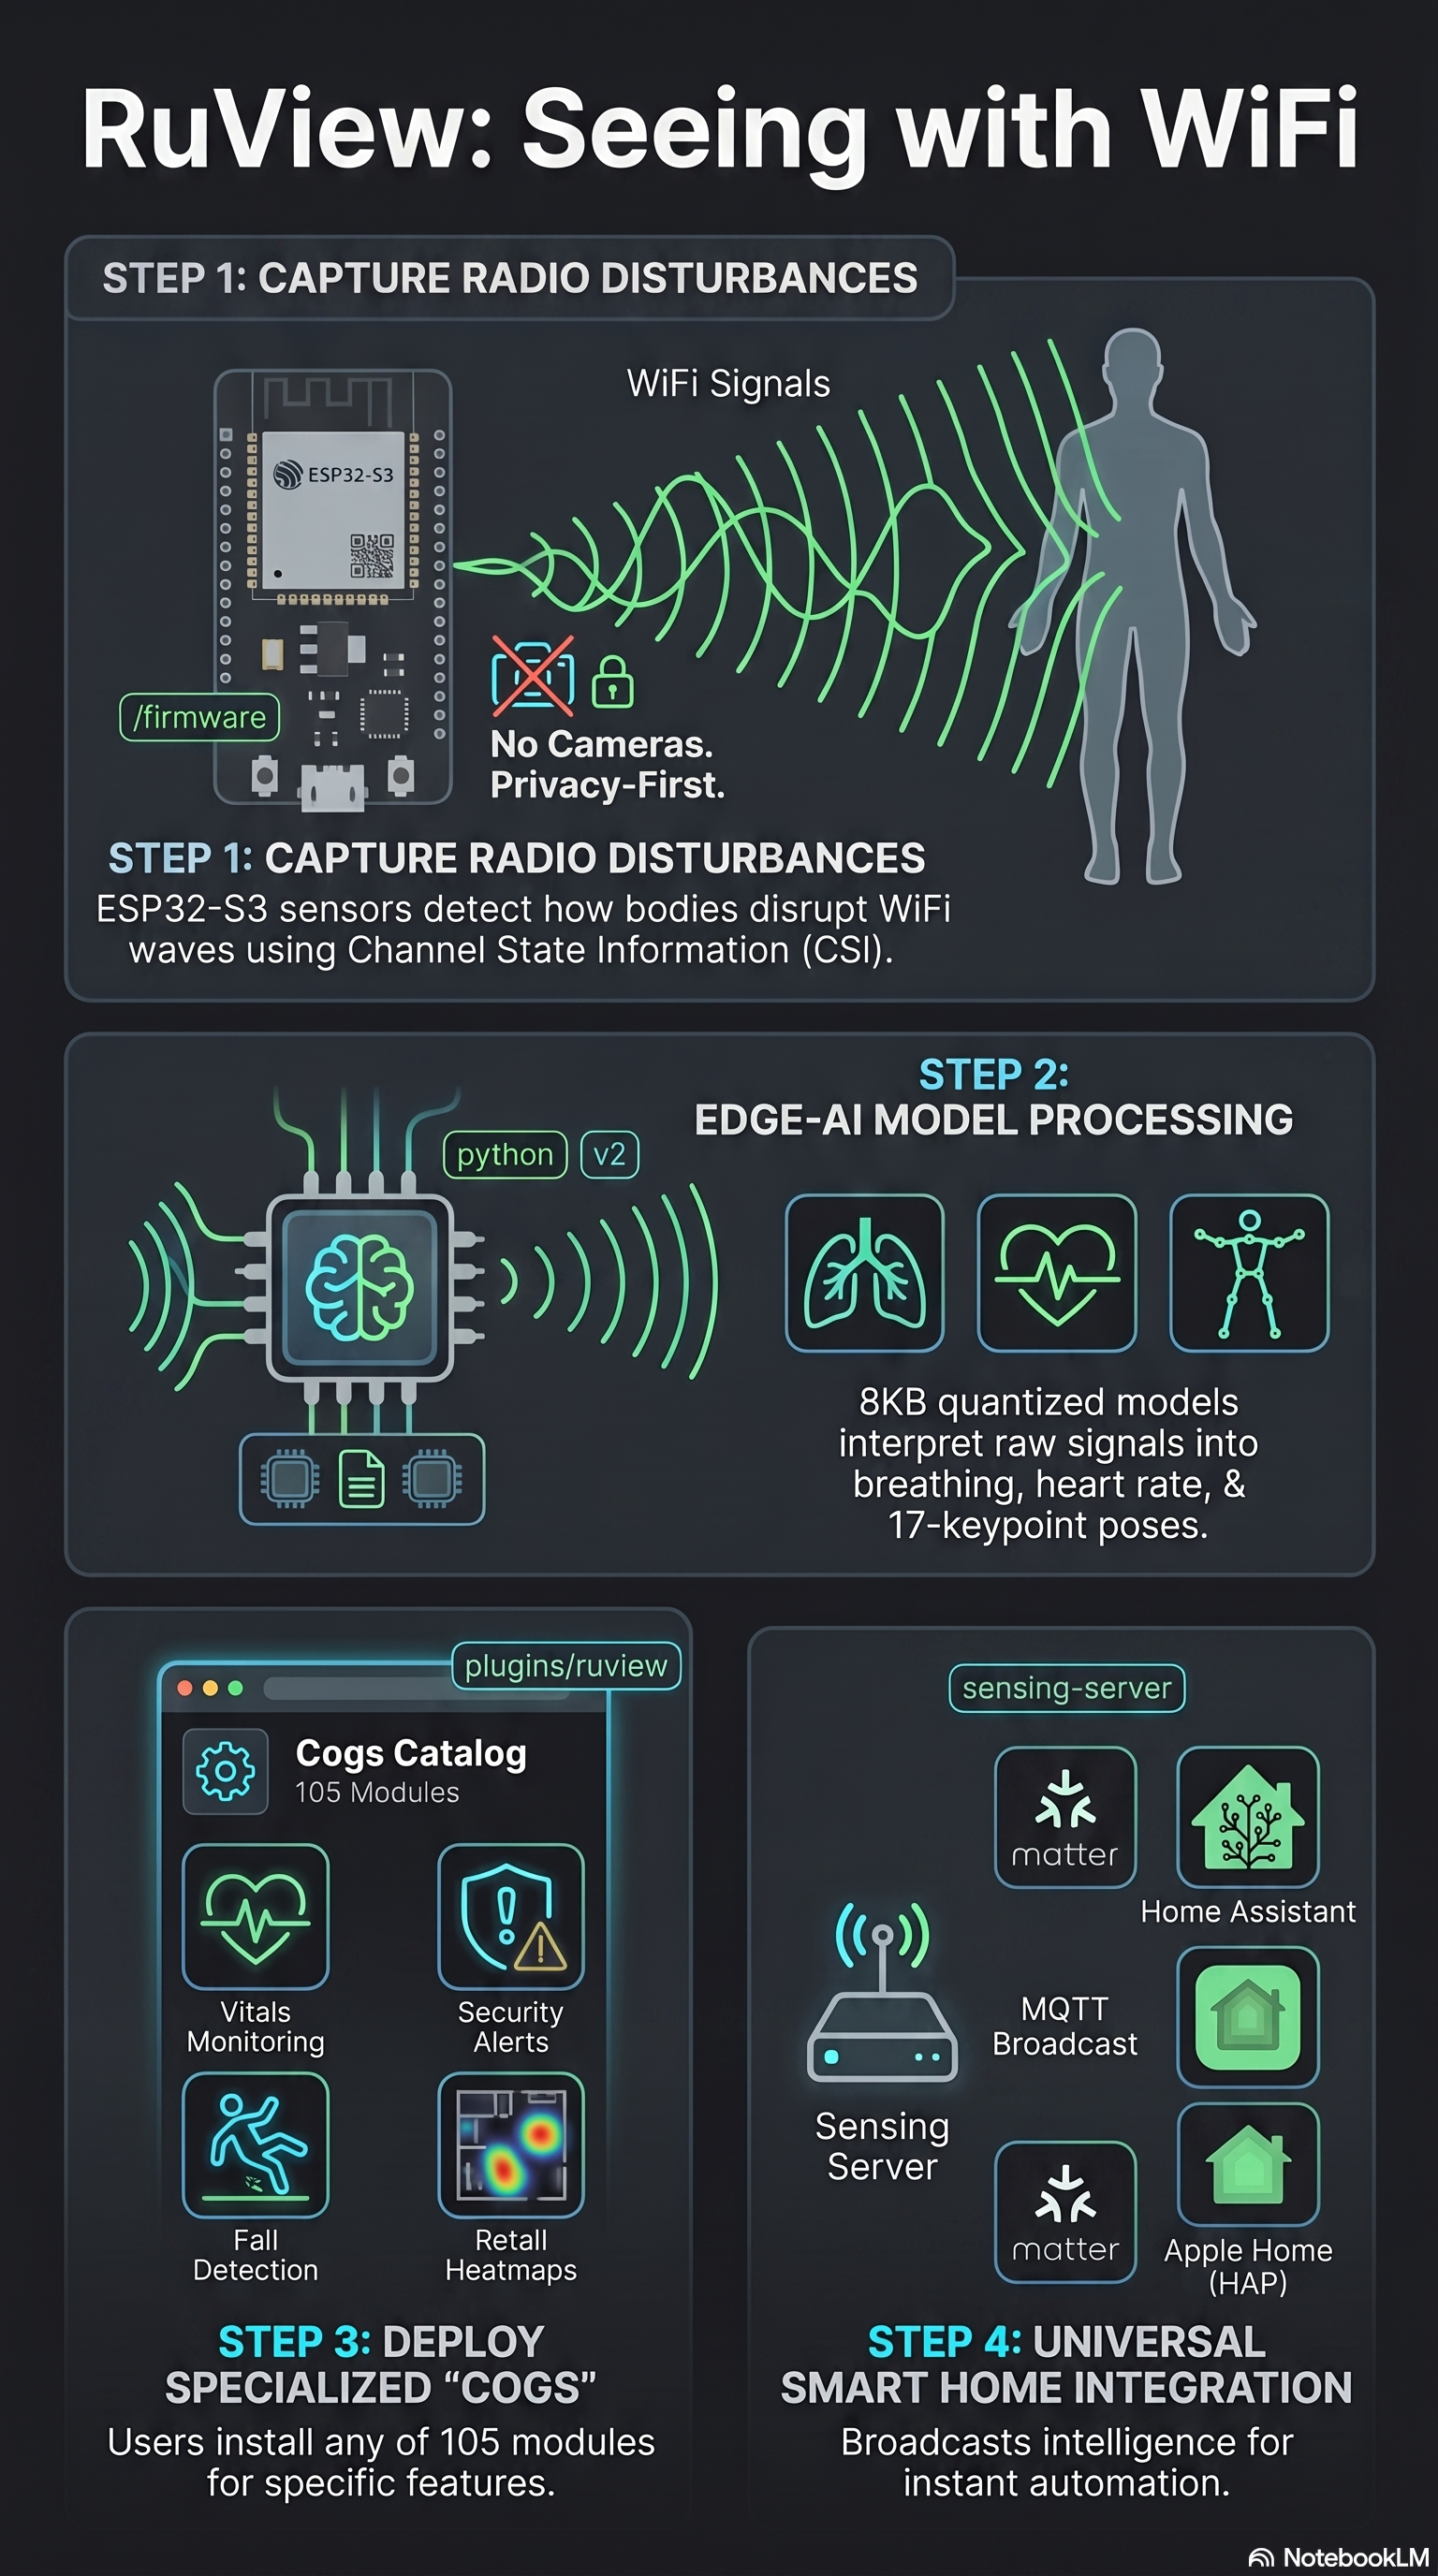
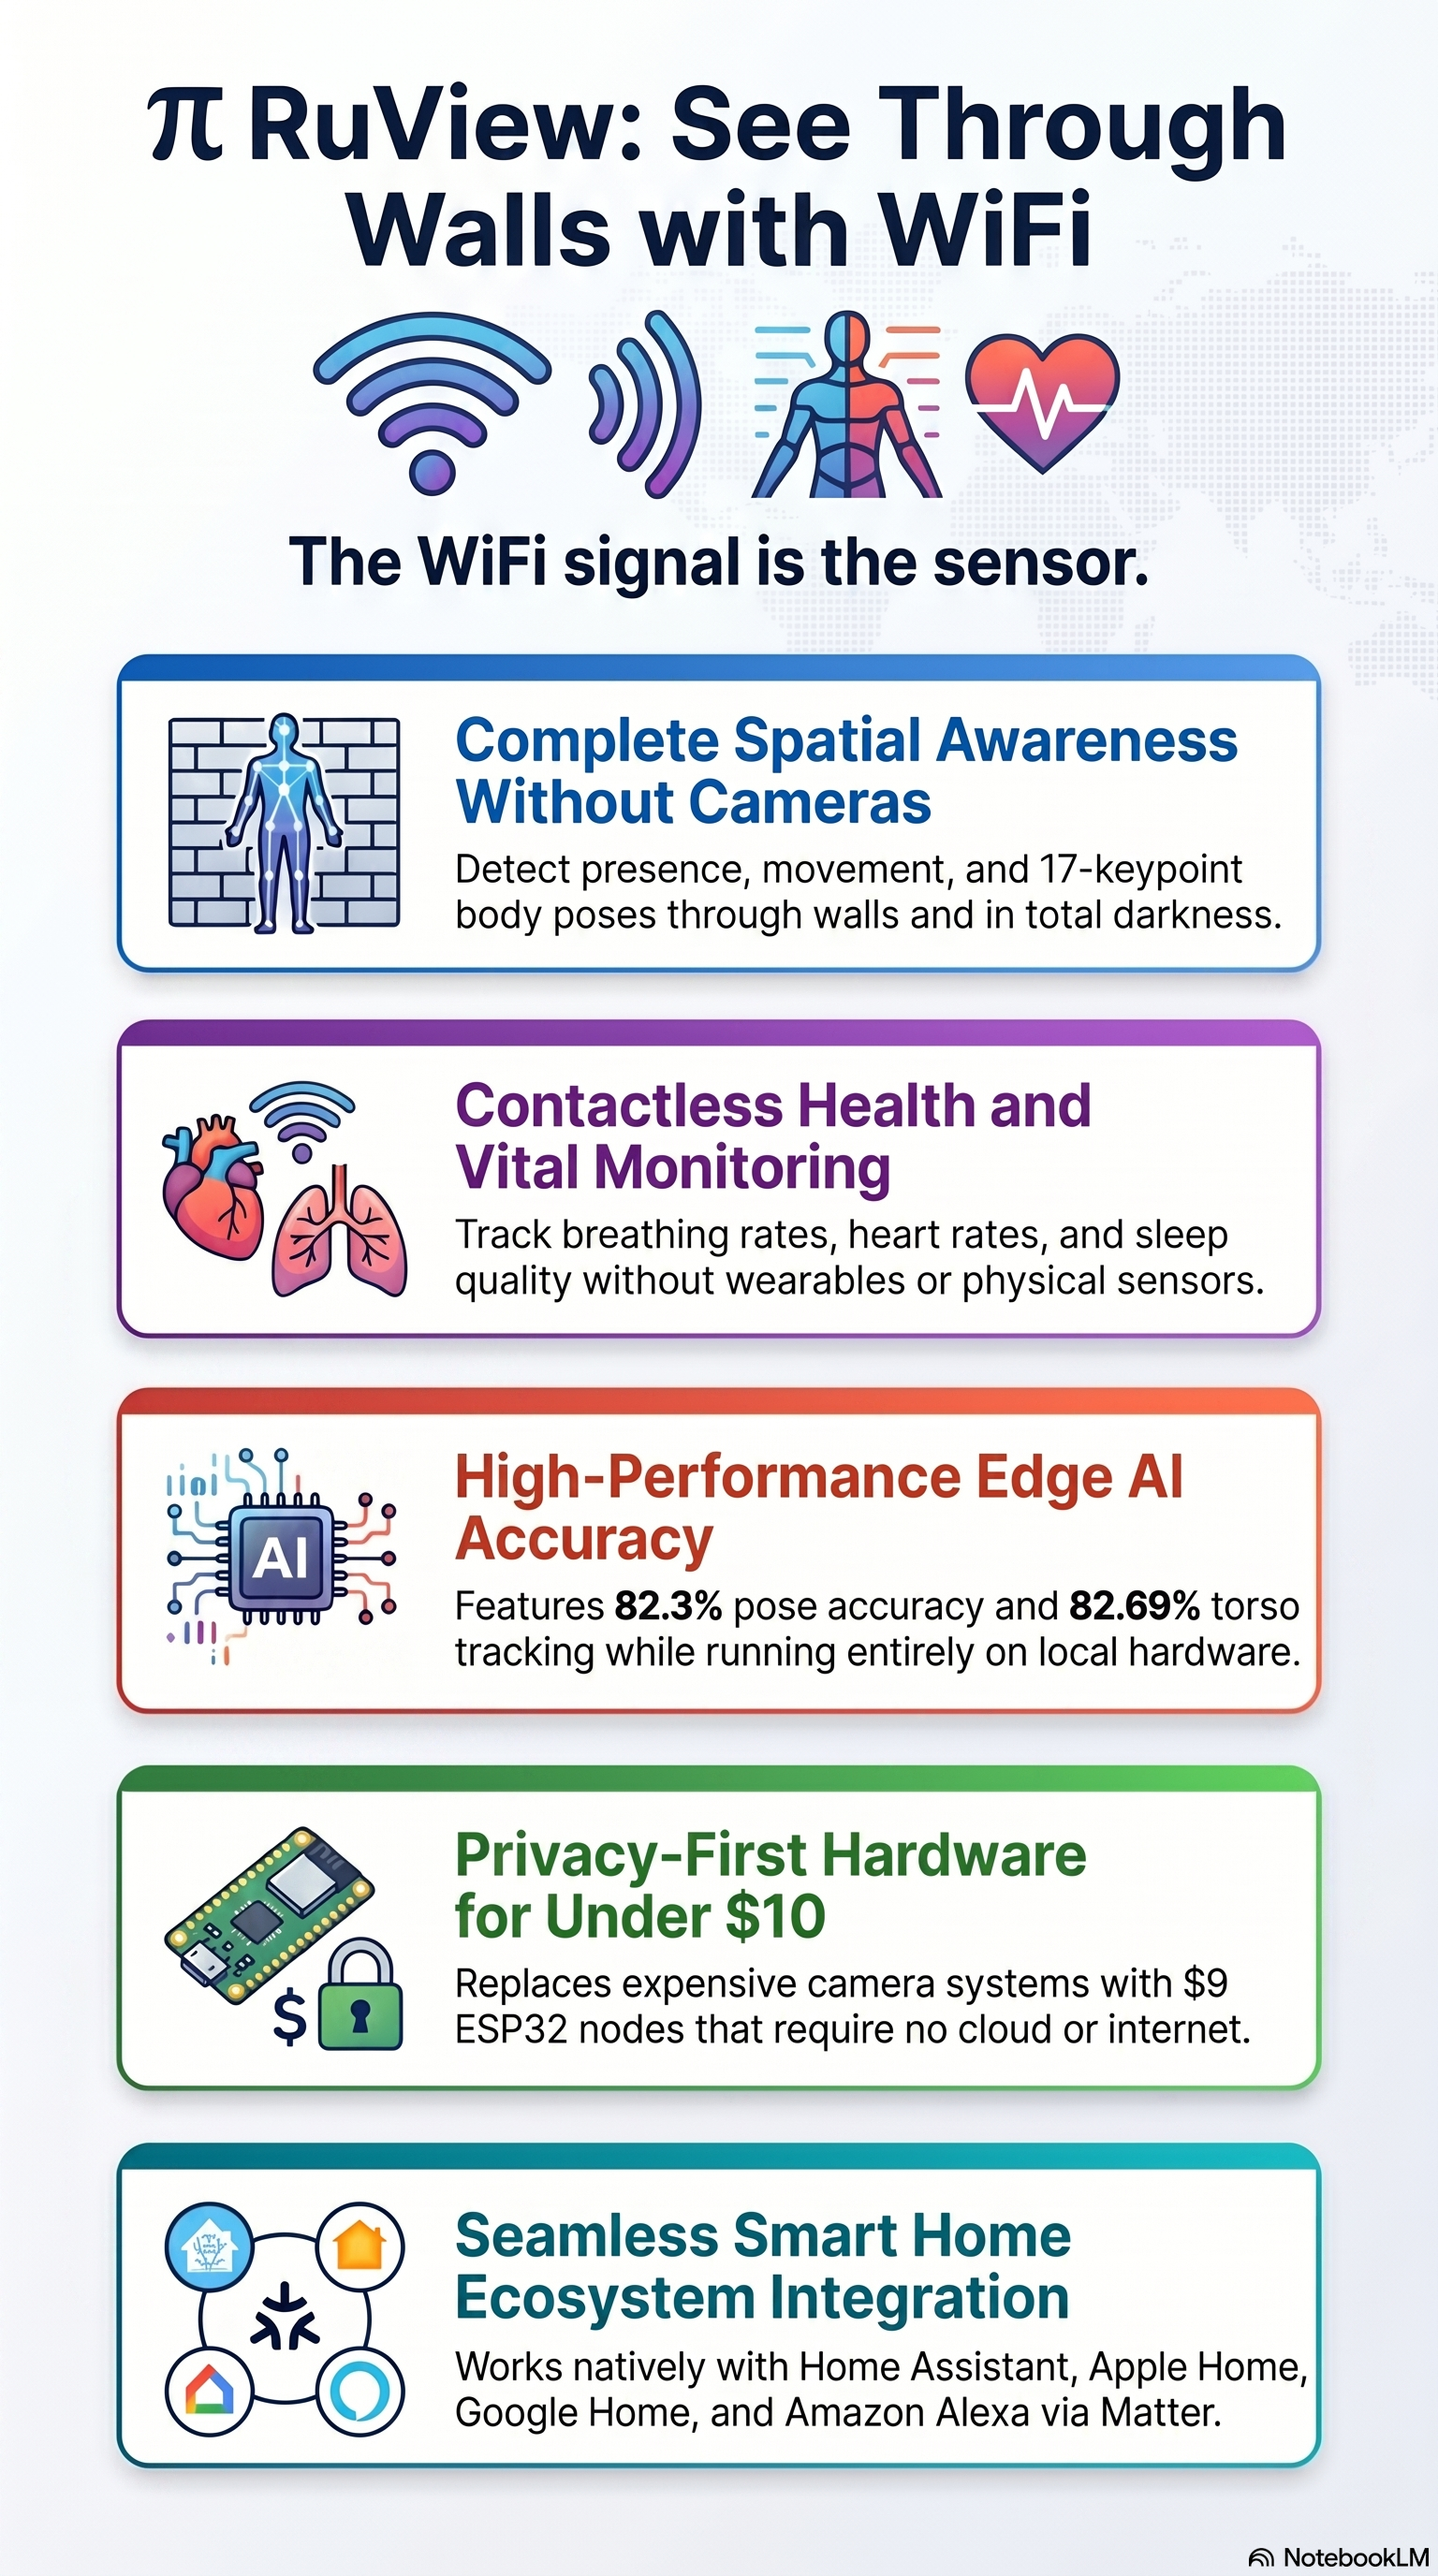
The part most guides skip. There are two ways a sensor's data gets to your Seed, and picking the right one saves you days.
The Seed reads simple sensors bolted to its own pins, 10 times a second, into its memory "fingerprint." Works on the Seed today, no extra computer.
The three sensors in this guide — radar, vital-signs radar, WiFi CSI — produce far more data than the Seed's GPIO pins can take. Instead they connect to your Cognitum One Seed over USB or WiFi, and it does the heavier sensing.
A Seed's own built-in WiFi chip cannot produce CSI — that's why WiFi-sensing needs separate ESP32-S3 / C5 nodes (which can) that stream their CSI to the Seed over WiFi. Plan for 7 nodes — not two; one or two can't locate anything (here's how to build the array). The full step-by-step is on the Setup & flashing page →
Your mileage may vary: the exact pins, ports and config names here come from one reference build. Always confirm against your own device's config and firmware.
The short version of your first win. The full, careful walkthrough — cables, flashing on your Mac/PC, WiFi, talking to the Seed — lives on the Setup & flashing page.
Open the full Setup & flashing walkthrough →
| If it looks like… | It's… | It does… |
|---|---|---|
| A small radar board with a 4-pin cable + a USB adapter dongle | LD2450 USB kit | Position tracking |
| A small black module behind a textured cover, USB-C | MR60BHA2 (Seeed XIAO) | Heart & breathing |
| A stamp-sized board with a metal shield + pin headers + USB-C | ESP32-C5 / S3 CSI node | WiFi sensing |
| A small grey stick with a screen, a button & USB-C | M5StickS3 | Motion / vibration |
Most affordable sensors are built around an ESP32 — a cheap WiFi/Bluetooth microcontroller from Espressif. Knowing the variants tells you what a sensor can and can't do.
| Chip | Architecture | Cores / Clock | SRAM | WiFi | Bluetooth | Standout feature | ~Price |
|---|---|---|---|---|---|---|---|
| ESP32 original | Xtensa LX6 | 2 · 240 MHz | 520 KB | 802.11n · 2.4 GHz | Classic + BLE 4.2 | The mature, do-everything default | $3–10 |
| ESP32-S2 | Xtensa LX7 | 1 · 240 MHz | 320 KB | 802.11n · 2.4 GHz | none | USB-OTG; far better deep-sleep | ~$6 |
| ESP32-S3 used here | Xtensa LX7 | 2 · 240 MHz | 512 KB | 802.11n · 2.4 GHz | BLE 5.0 | AI/vector instructions; 192-subcarrier CSI | ~$4 |
| ESP32-C2 | RISC-V | 1 · 120 MHz | 272 KB | 802.11n · 2.4 GHz | BLE 5.0 | Smallest & cheapest, 4×4 mm | ~$4 |
| ESP32-C3 | RISC-V | 1 · 160 MHz | 400 KB | 802.11n · 2.4 GHz | BLE 5.0 | Best-in-class low power (~5 µA sleep) | ~$4 |
| ESP32-C5 used here | RISC-V | 1 · 240 MHz | 400 KB | Dual-band WiFi 6 · 2.4 + 5 GHz | BLE 5.2 | First ESP32 that does 5 GHz WiFi | ~$18 |
| ESP32-C6 in the MR60 | RISC-V | 1 · 160 MHz | 512 KB | WiFi 6 (ax) · 2.4 GHz | BLE 5.3 | 802.15.4 Thread/Zigbee/Matter | ~$4 |
| ESP32-H2 | RISC-V | 1 · 96 MHz | 256 KB | none | BLE 5.0 | Dedicated Thread/Zigbee mesh radio | ~$3 |
| ESP32-P4 | RISC-V ×2 + LP | 2 · 400 MHz | 768 KB | none | none | H.264 video, MIPI camera/display | n/a |
Notice the 2.4 GHz vs. 5 GHz column. The ESP32-S3 and the original ESP32 are 2.4 GHz only — by silicon. They physically cannot join a 5 GHz-only WiFi network, no matter what you configure. Only the ESP32-C5 speaks 5 GHz. If a board "won't connect" to your fast network, that's almost always why — it's not broken, it's the wrong band.
An ESP32 is just the brainstem of a sensor. What matters is the physics module bolted to it. Here are the sensors you can buy and use today — three that sense a room contactlessly, plus the M5StickS3 you attach to an object for motion. Each has the real product photo and a direct buy link.
The expectation-setter nobody tells you. A single sensor gives a single, narrow viewpoint — a lone WiFi node can tell "something moved" but not where. Plan for multiples from the start, or you'll be disappointed.
| Sensor | Bare minimum | Recommended | Why one won't do |
|---|---|---|---|
| ESP32 WiFi CSI | 3 nodes | 7 (3 on 2.4 GHz + 4 on 5 GHz) | One node only senses "something changed." Position & shape need several sightlines to triangulate; 7 wraps the room with a spare. |
| LD2450 radar | 1 | 2–3 per room | One covers a cone; corners, blind spots and left/right asymmetry need a second and third. |
| MR60BHA2 vitals | 1 | 1 per seat/spot | It reads one subject facing it — it can't follow someone moving around the room. |
| M5StickS3 (IMU) | 1 | 1–2 | One reads an object's motion; two let you compare two points (e.g. how vibration travels from a source to a body). |
Minimums are physics: three is the geometric minimum to locate a point in 2D (you need sightlines from three directions to triangulate); seven gives full wrap-around coverage with a spare node. "Recommended" reflects a working whole-room build.
24 GHz mmWave radar · position
Tells you where a person is on a 2D floor plan — their X/Y position and how fast they're moving — by bouncing 24 GHz radio off them. No camera, works in total darkness, sees through clothing.
60 GHz mmWave · vital signs
Measures heart rate and breathing rate contactlessly — it senses the millimetre-scale motion of your chest and skin via 60 GHz Doppler. No chest strap, no watch. Sits facing you within ~1.5 m.
WiFi CSI · presence & shape
The cleverest trick here: an ordinary WiFi chip reads how radio waves scatter off your body (Channel State Information). With several nodes you get rough body shape, presence, and breathing — through walls, with no dedicated radar at all.
IMU · motion & vibration
The one sensor here you attach to an object — it measures that object's motion, tilt and vibration with a built-in accelerometer. Battery-powered, streams over WiFi. Not contactless like the other three, but the way to capture how something physically moves.
They overlap, but each is best at one job. Here's the cheat sheet.
| Technology | Frequency | Best at | Spatial detail | Through walls? |
|---|---|---|---|---|
| LD2450 radar | 24 GHz | Precise 2D position & speed | ±5 cm XY | Limited |
| MR60BHA2 | 60 GHz | Heart rate & breathing | n/a (vitals) | Limited |
| ESP32 WiFi CSI | 2.4 / 5 GHz | Presence & rough shape, anywhere | Coarse (~30 cm) | yes |
| M5StickS3 (IMU) | — | Motion/vibration of an attached object | n/a (on-object) | on-object |
This is the step that makes or breaks WiFi sensing — and it's where most people fail. Buying the nodes is half of it; how you arrange them in the room is the other half. You can't pile them on a desk in front of you and expect a 3-D picture.
Three is the bare minimum to locate anything (you need sightlines from three directions to triangulate). Seven is the sweet spot — it wraps a proper sensing "cloud" all the way around a person (front, back and sides) with enough overlap that furniture and bodies don't create blind spots, plus a spare node or two so one dropout doesn't ruin your coverage. They're cheap, and that headroom is what keeps setup from being frustrating. (Ruv's rule of thumb is 7 — a prime number, and the count where it just works.) A typical split is 3 on 2.4 GHz (ESP32-S3) + 4 on 5 GHz (ESP32-C5).
This is the question every beginner hits, and the answer is simple: build yourself a status screen. Point a small dashboard at the Seed's live data stream so you can watch every sensor — radar, vitals, and all your ESP32 nodes — arrive, flow into the Cognitum One Seed, and get consolidated in RuVector into one picture. If a tile is green, that sensor's data is making it all the way through. If it's red, you know exactly which one to go fix.
The detail everyone forgets. The instant you place WiFi-CSI nodes away from a wall outlet — in corners, on shelves, around a room for a mesh — each one needs its own small, light, rechargeable power source. Here's how to do it cheaply.
Pick an ESP32 board with a built-in battery connector and charger, then plug in a flat LiPo pouch. Recharge in place over USB — no extra electronics. Lightest option, perfect for scattering.
An ESP32 board with an onboard 18650 holder (the AA-sized lithium cell from laptops). Cheap cells, big capacity, drop-in. Heavier than a pouch, but runs longest.
The no-thinking option: a pocket power bank + a USB cable into the ESP32. Works instantly. But there's one infamous gotcha that makes them mysteriously die.
If your board has no charger, add a TP4056 charging module (about $1) between a bare LiPo and the board. It safely charges over USB and protects the cell.
A CSI/streaming ESP32 keeps its WiFi radio on, so budget roughly 120–160 mA average. Runtime ≈ battery mAh ÷ average mA:
For an always-on mesh, plan to recharge daily, or wire nodes to USB wall power where outlets allow.
(1) Never charge unattended on flammable surfaces. (2) Never puncture, crush, or fold a pouch — if it swells, retire it. (3) Always use a proper charger (TP4056 or onboard), never raw voltage. For a room full of nodes, lean toward boards with built-in protection.
The most advanced idea in this stack — identifying who is present with no camera, from the unique way a body disturbs radio. Here's what's real today (honestly), using Ruv's open-source RuView.
Full submodule + plugin walkthrough is on the Setup page. Putting a name to a person is a separate layer, not part of RuView.
Beginner-friendly, plug-and-play versions only. ▸ direct links were correct when last checked; ⌕ search links point at a product category. Always open the page and confirm before buying.
The things a brand-new owner usually asks next.